Compression Spring Calculator Instructions
Step 1.
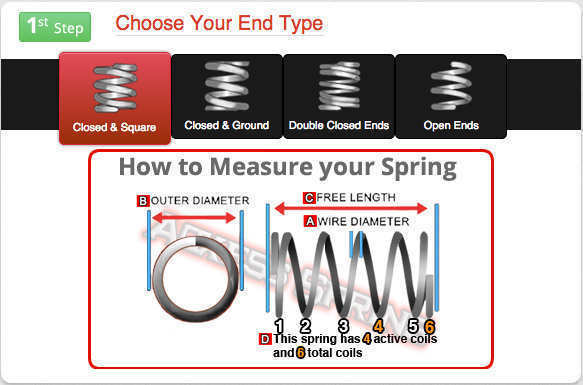
Choosing the end type of your spring can be critical.
Closed and Square Ends:
Most cost-effective and frequently used type of coil compression spring ends. Unless your coil compression spring needs to meet certain demands like having a shorter solid height, closed and squared ends are the leading option. In most cases closed and squared ends will stand upright.
Closed and Ground Ends:
Extra manufacturing labor is needed so this type of ends is not so cost-effective but it is also a frequently used type of coil compression spring end. It gives your coil spring more balance by helping it stand upright on a flat top. This type of ends will be beneficial in case your spring is too long in relevance with its outer diameter.
Double Closed Ends:
Double closed ends are basically closed ends with another closed coil added to them. These are also used to provide balance with springs that have large outer diameters and smaller wire diameters so the spring ends don’t protrude on top of each other when compressed. Double closed ends are more cost-effective than closed and ground ends.
Open Ends:
This type of ends is needed when you need your spring to travel or compress down to a shorter solid height, making it favorable to take the closed coils out. With this type of compression spring ends all coils are active and the spring will have to go over a mandrel or inside an orifice to be held in place.
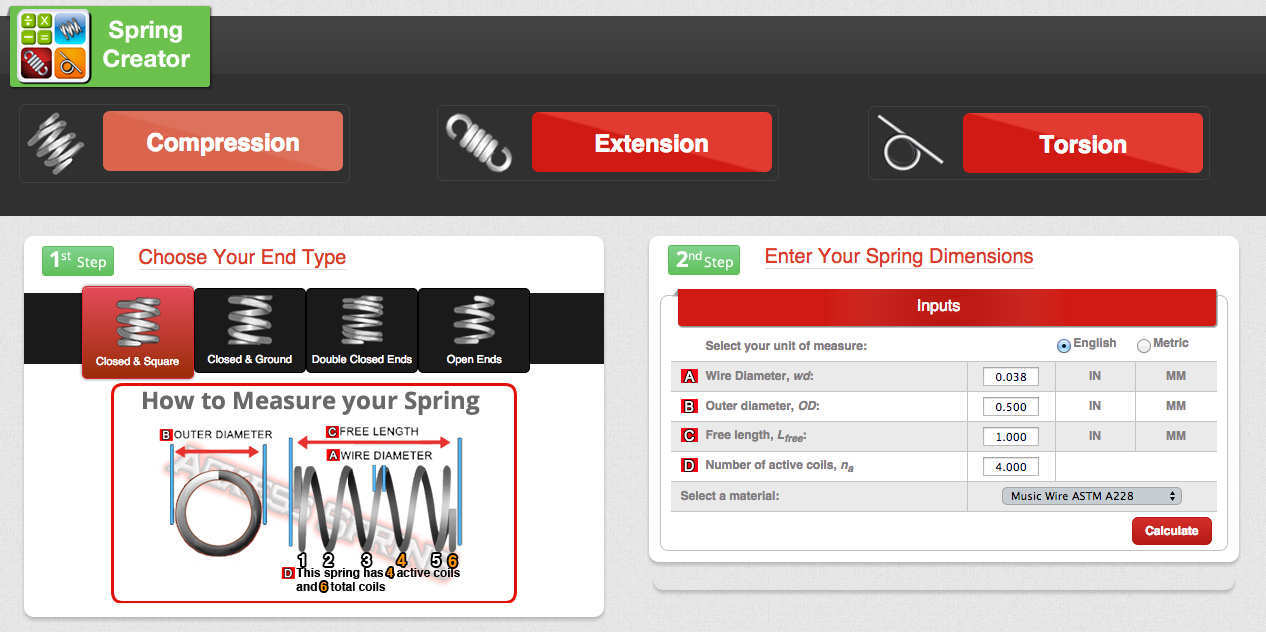
Choose Your End Type
Step 2.
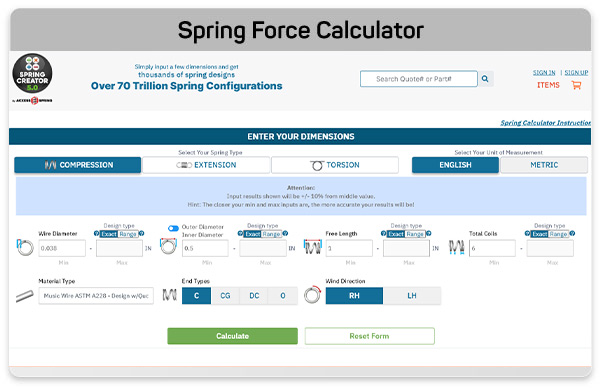
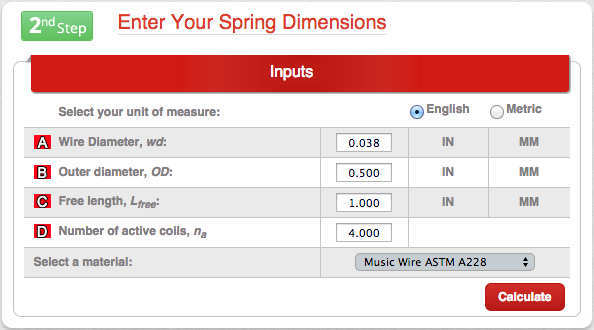
This is where you input your compression spring measurements. The measurements needed are wire diameter, outer diameter, free length, active coils, and a material type. Once you have entered these values, you may click on “Calculate” and obtain the product of your coil spring design.
To calculate the active coils on your spring, you must subtract the number of closed coils from the number of total coils. For example, you have a spring with 8 total coils. If it has closed ends or closed and ground ends, you will subtract 2 coils from the eight total coils and get a result of six active coils. Furthermore, if this spring has double closed ends, you will subtract four closed coils from the eight total coils and get a result of four active coils.
Our coil compression spring calculator also grants you various types of material or wire types. Material types have different tensile strengths and some are individually used for certain demands such as environments with high temperatures or with a certain level of moisture or corrosion. If your spring isn’t being placed in harsh conditions and you don’t need any special demands, music wire is the best and most cost-effective option.
Enter Your Spring's Dimensions
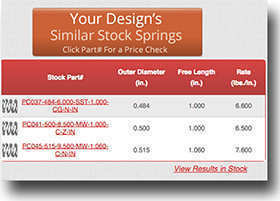
Similar Stock Springs and Closest Stock Spring
As you design your compression spring, Spring Creator will examine our extensive coil spring catalogue to determine if your spring is available for instant acquisition. We can also provide you with the nearest spring in stock to get some advancement in prototyping stages, saving you money and time.
Step 3.
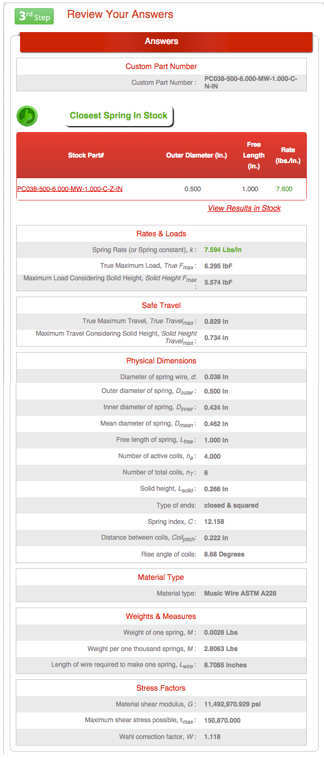
Here is where you see your calculated answers of your coil compression spring design. From the most minimal specification, like inner diameter or the space between the coils (pitch), to the most imperative specifications like spring rate, maximum load considering solid height, or maximum travel considering solid height. You will find it all using Spring Creator.
Rates and Loads:
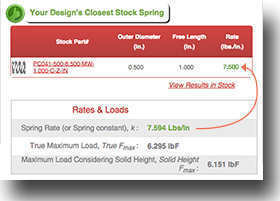
This is where you resolve the strength of your spring. The coil spring rate will be advertised in green since it is the “most important aspect” of your spring calculations. Rate resolves how much load you will need in order to compress or travel down to your needed loaded height and vice versa. On the area above Rates and Loads, you will notice that you are given your design’s nearest spring in stock and the spring rate is also advertised in green. This is why it is the nearest spring in stock, because it is the spring with the most similar spring dimensions including spring rate. You will see that you’re provided with two values, true maximum load and maximum load considering solid height. The contrast between them is that maximum load considering solid height is the maximum load of your actual design and true maximum load is a potential load you can accomplish if you increment your coil compression spring’s free length.
Safe Travel:
This category gives you information representing how much you will be able to travel or squeeze your coil compression spring. You are also given two different values here; true maximum travel and maximum travel considering solid height. Like load, maximum travel considering solid height is the travel you will get out of your actual design while true maximum travel is a potential amount of travel your spring may accomplish if you increment the coil spring’s free length.
Physical Dimensions:
Ok you’ve input some of your spring’s physical dimensions in step 2 but here you are given some more detailed information respecting your spring’s physical dimensions. The additional dimensions provided are inner diameter, mean diameter, total coils, solid height, spring index, distance between coils (pitch), and the rise angle of coils. Mean diameter is the diameter in between your spring’s inner and outer diameters (from center of wire to center of wire) and it is used along with the wire diameter to calculate spring index. Spring index is the proportional ratio between your spring’s outer diameter and its wire diameter. This helps to determine the level of manufacturing difficulty of your spring. Total coils are the overall coils of your spring, active and non-active. Total coils help to calculate the solid height of your spring which is the height of a coil spring when it is completely compressed and all the coils are in contact. The pitch is the distance between your spring’s uncompressed active coils. The rise angle of coils is the diagonal angle your spring’s coiled wires compose in order to implement that pitch.
Material Type:
This area shows the material type you picked your spring design to be made of.
Weights and Measures:
This section show you the weight of one spring or of one thousand springs as well as how many inches of wire your spring requires to be made. This section will help in the manufacturing phase of your helical compression spring as well as the shipping phase.
Review Your Answers
Step 4.
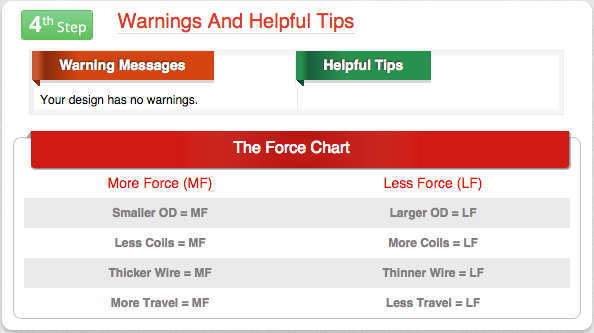
This section helps to give you specific warnings representing your spring design as well as giving you tips on how to make modifications or improvements so that you have a good spring design. You are also given our force chart in case you require your spring to be stronger or weaker. For more force, you would have to make the outer diameter smaller, take some coils out, thicken the wire diameter, or add more travel by augmenting the coil spring’s free length. To make your spring weaker, you would have to do the contrary; make the outer diameter larger, add some coils, thin out the wire diameter, or make less travel for your load by making the free length shorter. The warnings and tips (solutions) you might get are the following:
Warning: Your index is too small (below 4) which makes it difficult to manufacture.
Tip: In order to increase your index you will need to increase your outer diameter or decrease your wire diameter.
Warning: Your index is too large (above 15).
Tip: In order to decrease your index you will need to decrease your outer diameter or increase your wire diameter.
Warning: Your free length is less than or equal to your solid height.
Tip: You have entered a free length that is not possible based on your other inputs. To fix this, here are some options: increase the free length, decrease the number of coils, or decrease the wire size.
Warning: Your inputs have generated invalid or negative answers
Tip: Please adjust your inputs accordingly.
Warning: The force in L2 is less than the force in L1.
Tip: Your L2 must be greater than your L1. The formula for load is: rate * distance traveled = load. Thus if your distance for L2 is greater than L1, your load at L2 must be greater.
Warning: Your loaded height exceeds the maximum safe travel
Tip: If you need to travel a certain distance that takes you beyond the max safe travel, here are some options: increase huber of coils, increase outer diameter, or increase wire diameter.
Warning: Your load exceeds the max safe load.
Tip: If you need to reach a load that takes you beyond the max load, you ned to change your input values. Here are some options: increase the number of coils, increase outer diameter, or decrease wire diameter.
Warning: Loaded height / solid height conflict.
Tip: Your loaded height cannot exceed your solid height. To solve this problem, here are some options: readjust your loaded height, decrease your number of active coils, or decrease your wire diameter.
Warning: Your spring may buckle.
Tip: If your spring is not placed in a hole or over a shaft and has a free length divided by mean diameter greater than 4, you run the risk of the spring buckling while being compressed. To fix this problem here are some options: place the spring over a shaft or in a hole, increase the wire diameter, or shorten the free length.
Warnings and Helpful Tips


Step 5.
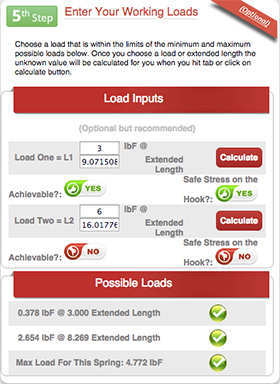
Pick a load that in between the limits of the minimum and maximum loads below. Once you’ve picked a load or loaded height, the unidentified value will be calculated in an automatic manner when you hit the tab key or click on calculate.
Note on load inputs: You must input a load value that is within the “Possible Loads” list that is under the load inputs. If you input a load value that’s NOT achievable ( or over the Maximum Load Considering Solid Height) the calculator will present a “Red Thumbs Down” telling you that you’ve gone over the “Maximum Load Considering Solid Height” shown on step 3. If you input an achievable load, the calculator will present a “Green Thumbs Up” Icon notifying you that the load value is achievable. Also, if you input a loaded height within the “Maximum Travel Considering Solid Height” shown on step 3 and hit tab or calculate the calculator will present either a “Green Thumbs Up” if the loaded height is achievable or a “Red Thumbs Down” if the loaded height is NOT achievable. Please regard your “Maximum Load Considering Solid Height” and “Maximum Travel Considering Solid Height” shown on step 3 because these values represent what your spring will achieve in load and deflection (travel). Going over these values is not suggested because your coil spring will take a SET and NOT return to it’s original free length. You will also lose load on your spring or worse, you will cause the spring to break. If you need more travel increase the number of coils, or increase your outer diameter as well as the wire diameter.
Enter Your Working Loads
Step 6.
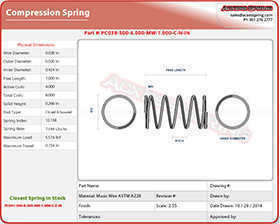
Generate Blueprint:
Click this and you will receive a real time blueprint of your exact spring design which is editable. You will have a perfect spring blueprint ready for manufacture. The editable fields you can include on this blueprint are: Part Name, Part Number, Drawing #, Drawn By, Revision#, Tolerances, Approved By, Finish (plating) and Manufacturing Notes. Once you’ve edited your blueprint, click on “Update Blueprint” and all the sections that you’ve edited will be renewed and reflected on your blueprint.
Blueprint and Design
Get a Quick Quote of Your Spring Design:
This feature lets you quickly send us a quotation. The spring blueprint will automatically be attached to the quote.

Email Design & Blueprint:
Once you’re pleased and satisfied with your blueprint, click on the “Email Design & Blueprints” and email the PDF blueprint directly to yourself, colleagues, and potential clients without leaving the Spring Creator App, incrementing efficiency and productivity.

Similar Springs in Stock:
This link shows you related springs and the nearest spring in stock to your design that is waiting for purchase. As you design your spring, Spring Creator will explore our extensive spring catalogue to determine if your spring is accessible for instant purchase. This will aid you in the prototyping and testing stages, saving you time and money.
Visit Our Free Online Extension Spring Calculator!!
